Configuring Applications
The core purpose of the Secfense Broker is protecting web applications. A simple setup was already explained in the Quick Start section of this document. The next sections of this guide will perform a deep dive into more detailed tweaking and adjusting of the configuration. This will help not only in the manual configuration of the rare cases where automated learning could not identify proper settings, but will also enhance user experience and provide more security to your environment.
All examples used in the below guide are based on an instance of Zammad as an example protected application. However, it is not really important which application is protected as long as it "speaks" HTTP.
Please keep in mind that out-of-the-box Secfense Broker is using TCP ports 80 and 443 to listen for traffic. If any other port is needed, additional actions must be performed.
Nonstandard application options
Apart from the typical application settings described in the Getting Started part of this guide, an operator can set additional options for nonstandard configurations under "Advanced Options" while creating an application representation.
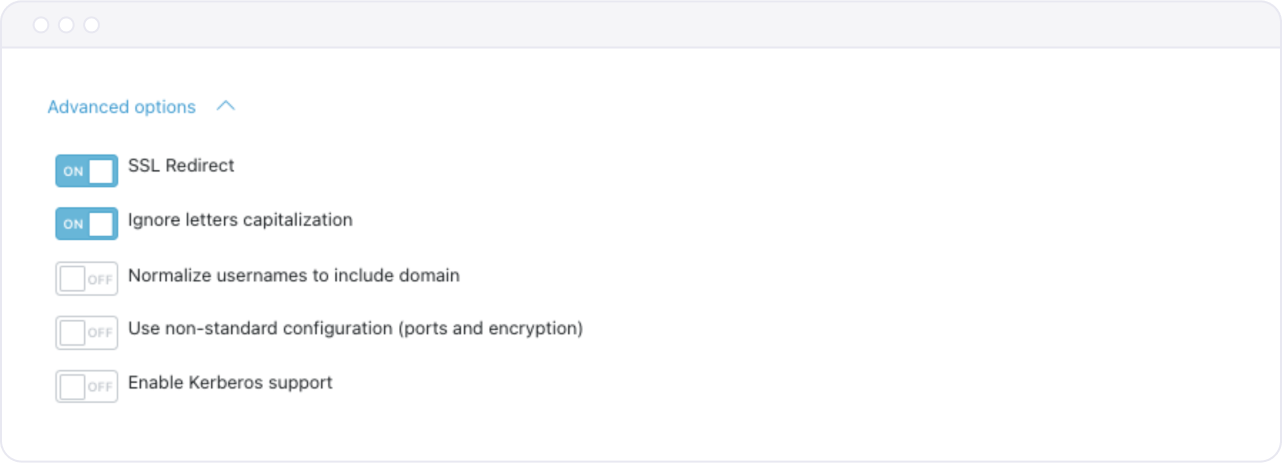
- SSL Redirect and Ignore letters capitalization are enabled by default. The first option terminates the TLS encryption on inbound traffic and re-encrypts it when the traffic leaves the device. Capitalization ignoring can be turned off when for some reason upper and lowercase letters do make a difference in the hostname.
- Normalize usernames to include domain – this changes the username into username@domain
- Use non-standard configuration (ports and encryption) allows you to define on which port the Broker should listen for the traffic and which port should be used for outbound traffic to the application and whether the traffic should be encrypted or not. By default (with the - "SSL Redirect" option) it will be "443" and "yes"
- Finally, Enable Kerberos support allows you to add a keytab file and add another layer of protection for SSO applications
MFA Policies
Secfense Broker allows for several means of providing 2nd factor to your protected applications. We do encourage to use FIDO2/Webauthn based authentications, however other are also available:
- FIDO2/Webauthn - FIDO2 compliant means of authentication like physical U2F keys, Windows Hello or Apple Face/Touch ID
- TOTP – Time-based One Time Passwords allow to use 3rd party authenticators like Google Authenticator or Authy
- RADIUS – allows to configure 3rd party Radius service as an authentication provider
- SF Authenticator – Enables the use of Secfense proprietary application available for free in App Store or Google Play. Secfense Authenticator is compliant with FIDO2 standard
- OIDC Profiles – allows to use 3rd party Open ID Providers
- SMS/Email – once a SMS or email Gateway is configured in the Settings Secfense Broker can send messages with authentication code.
Particular users can be added as those required to use a certain MFA by clicking "Forced users" next to the 2nd factor. Forced users can also be defined using an LDAP link.
The above means of authentication must be used in conjunction with User Enrollment Policies. These policies define how strict the application is when it comes to forcing users to enroll in MFA. Secfense Broker offers the following policies:
SOFT
Users are encouraged to upgrade their security. Once a new user logs into the protected application, they are presented with a Secfense overlay and options to enroll in MFA. However, they are offered the possibility to skip and choose to enroll at a later time.
HARD
The Skip option is taken away, and users must enroll in MFA if they wish to proceed to the protected application.
OPT-IN
Both Soft and Hard enrollment policies can be used with the "Opt-in" policy. This policy allows defining which usernames would be subjected to MFA enrollment. The Opt-in policy alters the behavior of previously "Hard" and "Soft" for users that are not predefined:
-
Opt-in soft – only catches the predefined usernames, which are offered the possibility to enroll in MFA and ignores anyone else. Users not caught by the policy have the same user experience as before and MFA does not affect them.
-
Opt-in hard – predefined usernames are forced to enroll in MFA, and everyone else is blocked from using the application.
Use of the "Opt-in" policies requires configuring the users that would be affected. Secfense Broker offers three ways of performing this task.
- Adding OPT-IN Users Manually
Once an "Opt-in" policy is selected in the Main Configuration, another tab appears in the Application Representation config – "Opt-in Users". Each application Administrator or Support person can add users within this tab by using the "Create Opt-in User" button at the top right corner. To add an "Opt-in" user, just enter the expected username and click "Create".
Administrators or Support can also delete previously added users within this page.
- Configuring OPT-IN Users from LDAP
In order to be able to use LDAP as a source of "Opt-in" users, an administrator must configure LDAP in the Settings menu. Once the LDAP connection is ready, a new section will appear in the Advanced Configuration – "LDAP sync". An administrator can add a DN from which Secfense Broker will fetch the users for "Opt-in" policies.
- Using WebHooks to Add OPT-IN Users
The final method to add "Opt-in" users is by taking advantage of the REST API. When an API Access token is created with sufficient privileges, a REST API URL (webhook) can be crafted that performs the same action as the "Create" button in the adding "Opt-in" users section of the configuration. Some proficiency with REST API and HTTP protocol is needed to craft this URL.
Adjusting Application Headers
Some applications may require a deviation from the standard learning procedure in order to fully cooperate with Secfense Broker. In the "Headers" section of Advanced Configuration, these headers can be fine-tuned to fit the particular application's purpose.
- GZIP – enables compressed headers
- HSTS – enables HTTP Strict Transport Security
- Custom CSP – allows entering a Custom Security Policy to permit Secfense Broker traffic
- Custom permissions policy - allows to adjust policies to permit certain features
- X-Forwarded-Proto – chooses the type of X-Forwarded-For header The choice of the above options must be considered based on traffic analysis.
Adjusting the application learning mode
Changing the default user for learning mode
Some applications make use of form validation when a user is entering their credentials. Such validation typically checks for certain properties of the username and may require, for example, an email address to be entered before it can proceed with the authentication.
Secfense Broker uses a "probe" user with the name "inituser" by default to learn the application's login behavior. This username can be changed in the Learning section of Advanced Configuration and can be set to any string that would pass the form validation.
Confirming successful login
By design, a user is only saved as "Trusted" within the Broker database when a successful login is recognized. This means that a user not only has to complete second-factor enrollment, but they also need to successfully log in to the application.
This prevents a malicious actor from automating unsuccessful logins and expiring the Broker license.
Most applications have very predictable login behavior and fit perfectly within the "out-of-the-box" Secfense Broker configuration. Some, on the other hand, tend to deviate from set standards. The "Learning" section in the Advanced Configuration allows the Broker to recognize these behaviors by configuring certain responses of the protected application.
In order to recognize these patterns, an operator needs to perform a successful login and verify within the traffic what kind of HTTP response the application presents right after this action. A few options can be chosen:
- Response code – define which HTTP answer is used to respond to a successful login. By default, any answer can be used as a success factor.
- Successful login response body – identify a unique part of the response page that can be used as an indicator of a successful login.
- Successful login redirect location – identify where the user is being redirected (30X redirection) after a successful login.
- Cookie set name – if a cookie is set for a successfully logged-in user, enter the cookie name in the text box.
In all the above cases, a regex expression can be used to further adjust the application behavior.
Adjusting logout behaviour
By default, Secfense Broker uses a cookie that allows users to skip multifactor authentication for 10 minutes after an initial successful login. This setting helps ensure users are not required to use their MFA too often, such as in scenarios where short timeouts are set.
On the other hand, when a user explicitly logs out, it is expected that this 10-minute timer be reset, requiring additional authentication factors.
To capture this "logout intention," an administrator must monitor the traffic flow during the logout action and configure appropriate values in the Advanced Configuration of the Application Representation:
- Request Method – the HTTP method of the logout request
- URI Pattern – the location where the logout request directs (can be a regex)
- Response Code – the HTTP code of the logout request
- Query Parameters – if variables are used in the query, point to those directly related to the logout action
- Cookie Unset – if a cookie is set to end after the logout action, enter the name of this cookie here In most cases, only the first three options are required for a successful logout pattern configuration. Query parameters are used in apps that do not use directory locations in URLs but rather focus on query parameters.
Microauthorizations
Important: Microauthorisations are only available for FIDO/Webauthn compliant second factors. Users which have lesser standards enabled would not be able to use this function
Microauthorizations provide an additional layer of protection for certain vital parts of a protected application. This feature is triggered when pre-configured HTTP requests are detected, and it is up to the operator to identify these requests.
Please note that, although Microauthorizations can sometimes protect whole subpages, it is not advisable to use this feature for that purpose. It should be used to protect specific actions (such as pressing a "Submit" button).
An additional benefit of Microauthorizations is the ability to involve a third party (such as a supervisor) to approve the protected action, adding a four-eye principle to the authorization process.
Please note – it is not advised to use Microauthorizations in an application where the SOFT enrollment policy is used. For this function to work, a user whose actions need another layer of authentication must already be enrolled in MFA. If they skip the enrollment and then try to use a protected action, an error "User not set" will occur. Using a HARD policy prevents this scenario from happening.
Adding a Microauthorization
In order to add a Microauthorization, you need to capture an event that will trigger the Broker to protect the action. The best way to identify this event is to utilize a developer console and check what request is made right after executing the option you wish to protect.
In the example below, I intend to protect an action that occurs once a "Create" button is clicked. In the Network inspector of the developer console, I can see that this is the first request.
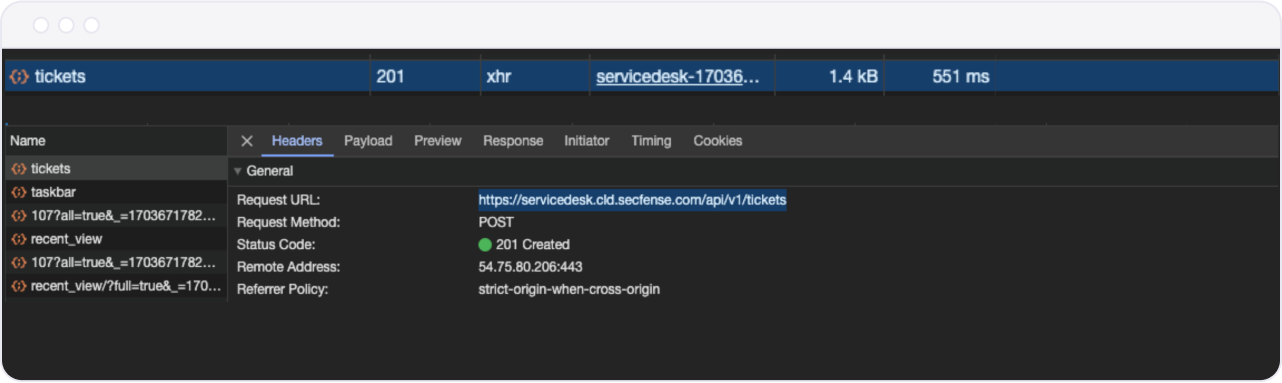
Out of this output, one can determine:
- It's an asynchronous request (XHR)
- The method is "POST"
- The requested URL is https://servicedesk.cld.secfense.com/api/v1/tickets You can also view the Payload of this request to find any unique strings that might identify it as your request of interest. For this purpose, only the previously mentioned information is required.
Navigate to your Secfense Broker and open the "Microauthorization" tab in the Application Representation you want to configure.
Click "Create new Microauthorization" in the upper right corner and fill out the required fields:
- Name – a unique name for the action
- Method – choose from POST, GET, PUT, PATCH, DELETE based on the information from the Developer Console
- Strategy – choose from XHR, FETCH, or FORMS based on the information from the Developer Console
- URI Regexp – enter the URI the requests direct to (it can be just the URI, or for more versatile solutions, a regex formula is also an option)
- Payload regexp – if no payload is identified as unique for this request, delete the default entry. If you identify a proper, unique part of this request payload, enter it here.
- Policy – choose from Owner (the user can approve this request by themselves) or Supervisor (another user, enrolled in MFA, needs to approve this action). You can choose to configure the Microauthorization but leave it disabled for the time being by switching the control next to "Active."
Click "Create" – once the Microauthorization is created, it receives a unique ID and its policy is already in effect.
On the same page, you can also remove, edit, or disable/enable previously created Microauthorizations.
Adding a Supervisor
If you choose to create a Microauthorization with the Policy "Supervisors," you need to specify who the users authorized to approve Microauthorization requests are. A Supervisor needs to be a user already enrolled in MFA via Secfense Broker.
Go to the Supervisors tab in the Application Representation and click "Create Supervisor" in the upper right corner.
Enter the login of the Supervisor (please ensure there are no mistakes) and click "Create."
Once finished, each time a user is caught by the Microauthorization with the Supervisors policy, a specified user(s) will have to approve their request using their own MFA method.
Supervisors can also be added via an LDAP link.
Headers
Secfense Broker's learning patterns and algorithms responsible for authorizations are based on typical login behaviors observed in most web applications. Some applications, however, deviate from these standards, requiring fine-tuning.
One of the many options that can be adjusted within the Application Representation configuration is headers.
In the Headers section of Advanced Configuration, you can configure:
-
GZIP – should be used when the web application makes use of "gzip" Content-Encoding.
-
HSTS – choose this option when HTTP Strict Transport Security (a standard that ensures browsers always connect to a website over HTTPS) is used.
-
Custom CSP – some web applications use a Content Security Policy (CSP)) header, which is an added layer of security preventing Cross-Site Scripting (XSS) or Data Injection attacks. Secfense Broker might be falsely recognized as such an attack by CSP. To prevent this, identify a CSP header in the Developer Console and paste its contents into the Custom CSP box in the Advanced Configuration.
A typical case where a CSP interferes with Broker operation is when you enable Learning Mode for an Application Representation, but the banner indicating that mode is active does not appear. You can check whether a CSP is involved by examining the Console in the Developer Console.
CSP can be configured as a report-only mode, which will generate errors but will not block the traffic when the policy is violated. It is up to the operator to decide whether it is necessary to create a pattern for such a policy.
For test purposes, an operator can use this CSP that overrides any restrictions:
default-src * 'unsafe-inline' 'unsafe-eval'; script-src * 'unsafe-inline' 'unsafe-eval'; connect-src * 'unsafe-inline'; img-src * data: blob: 'unsafe-inline'; frame-src *; style-src * 'unsafe-inline'; worker-src * data: blob: 'unsafe-inline'We do not advise keeping this in a production environment and recommend crafting a more secure CSP for normal use.
-
Custom permissions policy - this feature can be enabled on server side to define what can or can't be used on a certain website. If a required feature is blocked by this policy it can be explicitly allowed in this section. Just copy the existing policy and remove the sections that you want to allow.
-
X-Forwarded-Proto – an X-Forwarded-Proto header must be used in cooperation with Load Balancer deployments. Usually, automated identification is sufficient, but in some cases, an operator must decide whether this header is used in conjunction with HTTP or HTTPS.
Learning
Here are two separate features an operator can configure within the Learning section of Advanced Configuration. To understand them, we need to define two scopes of application learning:
- Initial Learning Mode: Used to identify Authentication Patterns.
- Learning the Behavior of the Application During Certain Actions.
The first scope is used only during the initial configuration. The second scope is broader and is used to define the whole user experience and, in some cases, the basics of multifactor authentication.
The first configuration item in the Learning section is connected with the first scope. By default, Secfense Learning Mode uses the probe user "inituser" to follow the authentication patterns of the protected application and apply the proper settings. In some cases, however, the form used to input the username and password may be subject to input validation and, for example, accept only emails as usernames. In that case, enter an acceptable value in the text box next to "Learning Mode" and click "Save." From now on, the Broker will listen for the specified username as a probe.
The next configuration items in the Learning section are related to the recognition of successful logins.
Please note that for a user to be saved as "Trusted" within the Application Representation, two conditions must be met:
- The user must successfully enroll in MFA.
- Enrollment must be immediately followed by a successful login.
Standard response to an unsuccessful login is HTTP 401 (Unauthorized). In most cases, this is sufficient and no further adjustments are needed. However, some applications deviate from this standard, and an operator must include these deviations in the configuration. This requires some insight into how the successful login appears (in HTTP requests and response terms) and, in some cases, knowledge of the protected application.
An operator can define the success of a login by configuring:
- Response Code – leave only the option that matches the HTTP response.
- Successful Login Response Body – if there is a distinguishable part of the response that uniquely identifies the successful login page, enter it in this text box—preferably in the form of a regular expression.
- Successful Login Redirect Location – in many cases, the application responds to a successful login with a redirection to another location. You can use either a URI or a regular expression here to define which redirection identifies a successful login or exclude certain locations (if the application uses redirections for both successful and unsuccessful logins).
- Cookie Set Name – when an application creates a cookie in response to a successful login, enter this cookie name here.
Patterns Exception
Once Secfense Broker identifies a certain URI as an entry point to an application, it will defend it against unusual behaviors. In most cases, it will be searching for username/password patterns in the requests and will flag any other requests as faulty or even dangerous, blocking them.
However, some applications use the same entry points for multiple actions. For example, passing a username and password might trigger a login, while passing only a username might trigger a password change request.
In such cases, a Pattern Exception must be configured to allow this traffic through Secfense Broker.
To configure a Pattern Exception, enter the following:
- Request Method – the expected request method of the traffic that should be allowed.
- URI Pattern – the endpoint location where the request lands (can be configured as a regular expression).
- Module – the module used for the request chosen for the exception.
- Parameters – the expected parameters in the previously chosen module.
- Regex – in cases where the traffic does not fit the predefined modules, an operator can choose "regex" as a last resort and craft a regular expression that uniquely identifies the traffic that should fall under the configured exception.
Logout Patterns
A newly configured Application Representation is set to prevent a user from being forced to use MFA every single time they log in. This is achieved by creating a cookie with a set time to live (by default 10 minutes, which can be changed in the "Other" section of the Advanced Configuration). Thanks to this cookie, within the given time frame, if the user is logged out and logs in again, Secfense Broker will not request a second factor. This behavior helps prevent "MFA Fatigue" in scenarios where applications have very short timeout periods and forceful logouts are frequent.
However, there are cases where a user intentionally logs out, and it would be preferable to ask for the second factor upon re-login. To identify such an intention, the operator can configure Logout Patterns.
In simple terms, a Logout Pattern identifies when a "logout" option was used in the application so the user can be asked for the second factor when they log in again, even before the cookie timer expires.
To configure a Logout Pattern, an operator needs to observe the Developer Console and packet flow during the logout action.
The first request after clicking the "Log out" button is usually the one that needs to be used in the configuration:
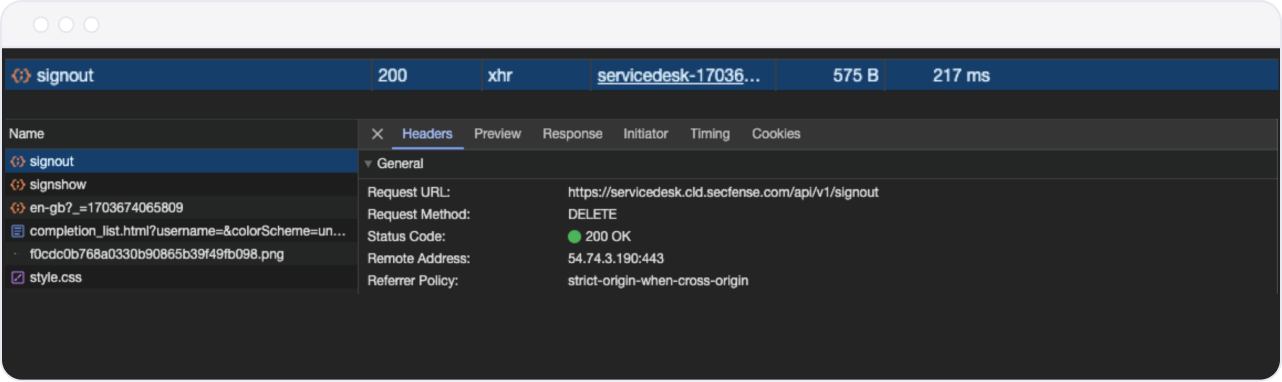
The above example shows an asynchronous DELETE request to https://servicedesk.cld.secfense.com/api/v1/signout with the status code 200 (OK) and no additional parameters.
To configure a Logout Pattern, click "Create logout pattern" in the Logout Patterns section of the Advanced Configuration. Enter:
- Request Method – choose the appropriate method based on the packet inspection.
- URI Pattern – enter the URI to which the logout request directs.
- Response Code – select only the response code of the appropriate request.
- Query Parameters – if the request contains additional parameters, input them here.
- Cookie Unset – if the logout action results in clearing a cookie, enter the cookie name here.
Once the Logout Pattern is configured, users will be asked for their second factor each time they log out and log in again. In other cases, such as when their session is timed out and they are within the configured time, they will not be asked for a second factor.
Domains
This section allows you to configure additional domains if the application requires it. These additional domains will use the same settings as the original domain unless configured otherwise.
To add an additional domain:
- Click "Add new domain."
- Enter the FQDN (Fully Qualified Domain Name).
- If required, change the upstream URL (app server IP).
- If required, use nonstandard network configuration.
- Click "Create."
The new domain will appear in a tabular form.
To delete a domain from the configuration, click "Remove" in the appropriate line.
The default domain cannot be deleted.
The additional domain must be different from the primary one (you cannot add an identical domain on another port).
Enhancing user administration with LDAP
Secfense Broker can be linked to an LDAP server (such as Active Directory) to utilize the directory structure for importing certain users for various purposes.
To sync Secfense Broker with an LDAP server, follow these steps. Once a server is added, a new section will appear in the Advanced Configuration of an Application Representation.
This new section (LDAP) allows you to define Distinguished Names (DNs) for places within the LDAP tree where users with particular roles are located:
-
DN of Opt-in Users – define a DN for users who will be affected by Opt-in policies.
-
DN of Supervisors – define a DN for users who would approve Microauthorizations. Additional options relate to adding a set of users who would be required to use a specific MFA (Multi-Factor Authentication):
-
DN of TOTP-forced Users – users required to use TOTP.
-
DN of U2F/FIDO2-forced Users – users required to use U2F/FIDO2.
-
DN of RADIUS-forced Users – users required to use RADIUS.
-
DN of Mobile-forced Users – users required to use Mobile MFA.
-
DN of OIDC-forced Users – users required to use OIDC.
-
DN of SMS-forced Users – users required to use SMS MFA.
-
DN of Email-forced Users – users required to use Email MFA.
Note: If a particular user is present in a security group referred to as one forcing to a particular second factor they will have this option enabled during enrollment even if it would be turned off in the basic configuration.
Full Site Protection
Secfense Broker is designed to provide multiple layers of protection for web applications. Full Site Protection is one of these layers; it provides a "shield" that prevents unauthorized users (including all kinds of bots or web crawlers) from even accessing the login page.
Full Site Protection is a feature that intercepts traffic to the protected site and forces users to provide their username and previously configured second factor before they can enter their credentials. This requires users to enroll in MFA prior to enabling Full Site Protection or access the service from one of the networks defined as trusted.
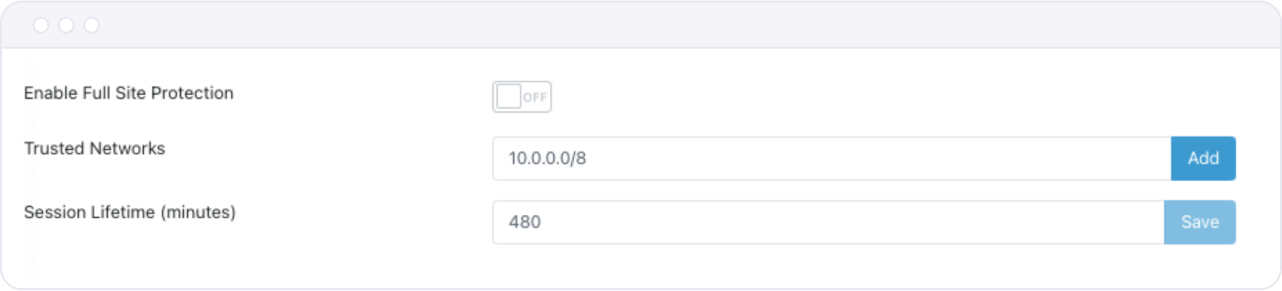
To enable Full Site Protection, follow these steps:
Scroll down to the Full Site Protection section in the Advanced Configuration.
Turn the switch next to "Enable Full Site Protection" to "On."
Enter at least one trusted network – Trusted Networks exclude certain parts of your infrastructure from this additional layer of protection.
Define a Session Lifetime – this counter specifies how much time must pass before a particular user is asked again for authorization to access the site.
Note: With Full Site Protection enabled it is impossible to perform self enrollment to second factor. In order to allow users to register their second factors in this scenario use the email converter functionality.
Adding own TLS Certificate
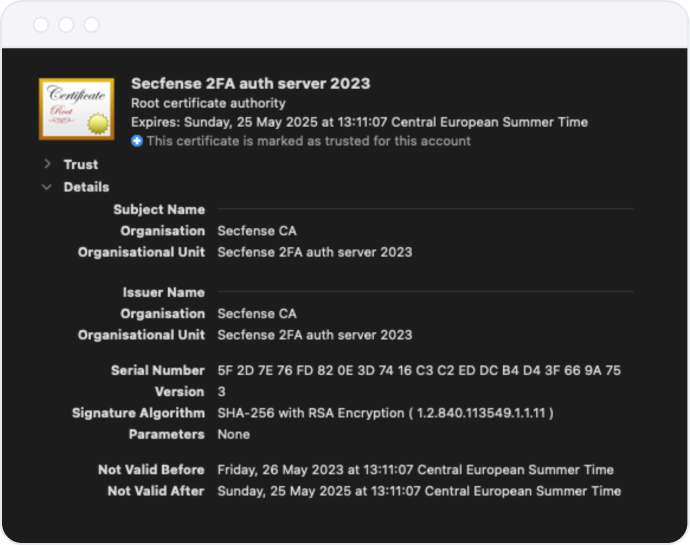
Out of the box, Secfense Broker is validated by a certificate issued by its own CA. This means that, in most cases, it would be deemed untrusted by all browsers in the infrastructure—at least until the Secfense CA is added to the list of trusted certificates.
The same is true for any Application Representations configured in an inline deployment, where Secfense Broker performs the TLS termination. During the creation of an Application Representation, a new certificate with the Common Name of the application domain is also created. You can view this certificate in the SSL/TLS Certificate section of the Advanced Configuration.
This issue can be resolved by downloading the CA from:
http://secfense_Broker_ip/ca.crt
To add your own certificate for validating the protected application, follow these steps:
Prepare the certificate and key in DER format (base64-encoded).
In the SSL/TLS Certificate section of the Advanced Configuration, check the radio button next to "Provide my own certificate."
Upload both the certificate and the private key in their respective sections.
Click "Save."
The application will now be validated by your certificate.
In scenarios where a load balancer is used, and all traffic passes through it before reaching Secfense Broker, TLS termination occurs before the Broker handles authentication. In such cases, adding your own certificates to match the environment CA is not necessary.
Preparing own translations and modifying the theme
Secfense Broker GUI and CLI are designed in English, but the user views presented during authorization actions are based on the browser's locale.
Currently, Broker supports three languages: Polish, English, and Spanish.
Certain parts of the user views can be customized using the Translations tab in Application Representation. You can set default text in a chosen language or revert to default by clicking "Set default" next to the chosen option.
To customize the graphics and overall style of the user views, you will need some knowledge of CSS. Follow these steps to modify the graphics:
-
Download the template package from this link
-
Modify the package to suit your needs.
-
Save the modifications and compress the folder public_templates into a ZIP file.
-
Upload the public_templates.zip to /secfense/app/shared on the appliance.
-
Use the following commands to unpack the templates and apply the style:
unzip /secfense/app/shared/public_templates.zip -d /secfense/app/sharedmv /secfense/app/shared/public_templates /secfense/app/shared/internal_public_customrm public_templates.zipdocker restart $(docker ps -q --filter "label=app=internalauth")
The newly added design synchronizes with the second device in cluster, so there is no need to repeat this procedure.
Trust Groups
Application Representations within Secfense Broker can be organized into trust groups based on common characteristics. When a user is authenticated in one application, they are considered trusted for a specified period in other applications within the same trust group. This means the user will not be prompted for a second factor when logging into any application from that trust group during the trust period.
To manage trust groups, follow these steps:
Adding a New Trust Group
- Go to the Trust Groups section in the menu.
- Click Add new trust group.
- Enter a name for the trust group.
- Set a Certification Expiration timer (this determines how long the trust period lasts).
- Click Save.
Each trust group will receive a unique ID. Assigning an Application to a Trust Group
- Navigate to the Advanced Configuration of the desired Application Representation.
- Scroll down to the Trust Groups section.
- Click Assign Trust Group.
- Select a trust group from the drop-down list.
- Click Assign.
Note: Each application can only be assigned to one trust group.
Detaching an Application from a Trust Group
- In the Advanced Configuration of the Application Representation,
- Scroll down to the Trust Groups section.
- Click Detach Trust Group.
WebAuthn
WebAuthn section is used to attest U2F keys based on their CA Certificate. At this moment only Yubico keys allow to use this feature as they publish their attestation CA:
https://developers.yubico.com/U2F/yubico-u2f-ca-certs.txt
Key attestation for U2F/WebAuthn is a security feature that can be configured per application within Secfense Broker, but it can also be set globally and reused across multiple Application Representations. Key attestation is a process used during key registration to ensure that only authorized keys are accepted for authentication. This feature leverages the FIDO2 standard, which provides a way to control the registration of keys by verifying certain attributes of the key's certificate.
Enabling Key Attestation
- Global Configuration:
- Navigate to Settings → WebAuth.
- Define the domain where the keys can be used. This ensures that U2F keys registered for one domain cannot be used in applications from other domains.
- Application-Specific Configuration:
- Go to the Advanced Configuration of the desired Application Representation.
- Find the key attestation setting and change it to true or inherited from global config.
Key Attestation Details When key attestation is enabled, the following attributes of U2F keys are verified during registration:
- Producer: Identifies the manufacturer of the key.
- Batch Serial Number: Indicates the batch of the key, though batches must contain at least 100,000 units as per FIDO2 standards.
- Certificate Subject: Provides information about the entity to which the certificate was issued.
Note: FIDO2 standards prevent the identification of individual keys to ensure privacy and security.
Further Configuration Options
Administrators can apply additional filters to further control which keys are allowed:
- Filter Issuer: Allow only keys from specific manufacturers by reading the issuer information from the key's certificate.
- Filter Serial Number: Restrict registration to keys from particular batches by specifying serial number ranges.
- Filter Subjects: Permit only U2F keys with specific subjects in their certificates. These settings provide a way to manage and restrict the types of keys that can be used for authentication, enhancing security by ensuring that only keys from trusted sources and batches are accepted.
By configuring key attestation globally or on a per-application basis, administrators can maintain a higher level of security and control over the authentication methods used within their applications.
Custom Directives
Custom directive section is used to influence NGINX settings that might interfere with the traffic based on observed circumstances. Some web applications do need a special treatment in terms of forwarding traffic between the user and server – for example if an application takes a lot of time to process data it can exceed the default NGINX timeout of 60 seconds and Secfense Broker can return a 404 error, even if the action has nothing to do with authorization. To remediate it Proxy Wait time should be increased. The settings available to configure are as follows:
These directives will not be described in detail, however users are encouraged to learn more about them in nginx documentation.
https://nginx.org/en/docs/http/ngx_http_proxy_module.html
https://nginx.org/en/docs/http/ngx_http_core_module.html
Other
This section contains all advanced settings that did not fit into any other category above:
- Cookie Expiration Time (minutes) – define the timer based on which users will not be asked for second factor after first login
- Subfolder – define a path for applications using a specific URI (like domain.com/folder)
- Custom JSinject Anchor – by default Secfense Broker injects its script just before the closing
</body>tag. In case there is no<body></body>or there is more content behind the last tag you can define before which closing tag should Secfense Broker choose to insert the script. Broker will pick the last iteration of this tag - Forward password to 2FA apps (secure) - when enabled Secfense Broker will ask you to provide which variable contains the password.

This option is used to forward this password to any application serving the second factor (for example some configurations of Radius) that requires credentials in order to be able to respond.
- Verify upstream SSL/TLS certificates – enable or disable certificate verification with application server. Secfense uses a list trusted CA published by Mozilla. If you want to verify the server certificate against your own CA please add it to this chain:
/shared/certs/CA/ca-bundle.crt
- Disable access log – disable the log stream regarding access actions.
- Browser fingerprinting – enable or disable a feature that saves over 200 metrics from user browser and saves it as trusted (user would not be repeatedly asked to provide second factor)
- Fingerprint TTL (minutes) – set the time during which the browser is considered trusted
- Bypass Code Length – set the number of characters of a bypass code
- Bypass Attempts Limit – set the number of faulty tries before a bypass code would be annulled
- User Dashboard URL – set the URI for place within the application, where user dashboard should appear
- User dashboard widget position – set the position of user dashboard widget
- Freeze – a feature that disallowed any changes to the application via administration panel. It should be used only in exceptional situations where there is a need for manual adjustments to the configuration files.